


One of the best ways to get started as an affiliate is through affiliate blogging. Of the 5 types of affiliates we usually see on ClickBank, content publishers with an affiliate blog are uniquely able to get started with almost no upfront cost, plus plenty of tools to help them out!
Personally, I love building a blog as a way to establish a brand and build an asset with consistent monthly traffic that I can monetize using affiliate products. In fact, I’ve done it myself – and I can teach you how to do it too in my newly launched affiliate blogging course inside of Spark by ClickBank. In this tactical and in-depth course, The Profitable Affiliate Blogging System, I let you look over my shoulder as I build a NEW money-making blog from scratch!
But since creating the website for your blog is such an important piece of the affiliate blogging puzzle, I wrote this epic guide to go along with my course. Read on to learn step-by-step how to create a blog with ClickBank Accelerator, the new funnel builder tool from ClickBank.
Let’s do it!
Join more than 117,000 affiliate marketers!
Get expert affiliate marketing insights delivered right to your inbox. Plus, subscribe now for a step-by-step guide to getting started on ClickBank!
What is an Affiliate Blog?
If you’re reading this post, you probably already know what an affiliate blog is, but for a quick refresher, I’ll summarize here:
An affiliate blog is a content website designed to attract organic visitors from search and encourage them to purchase affiliate products referenced in your content. When your readers go make a purchase based on your recommendation, you earn a commission for each sale.
It’s pretty simple in concept, and there are a lot of affiliate sites out there.
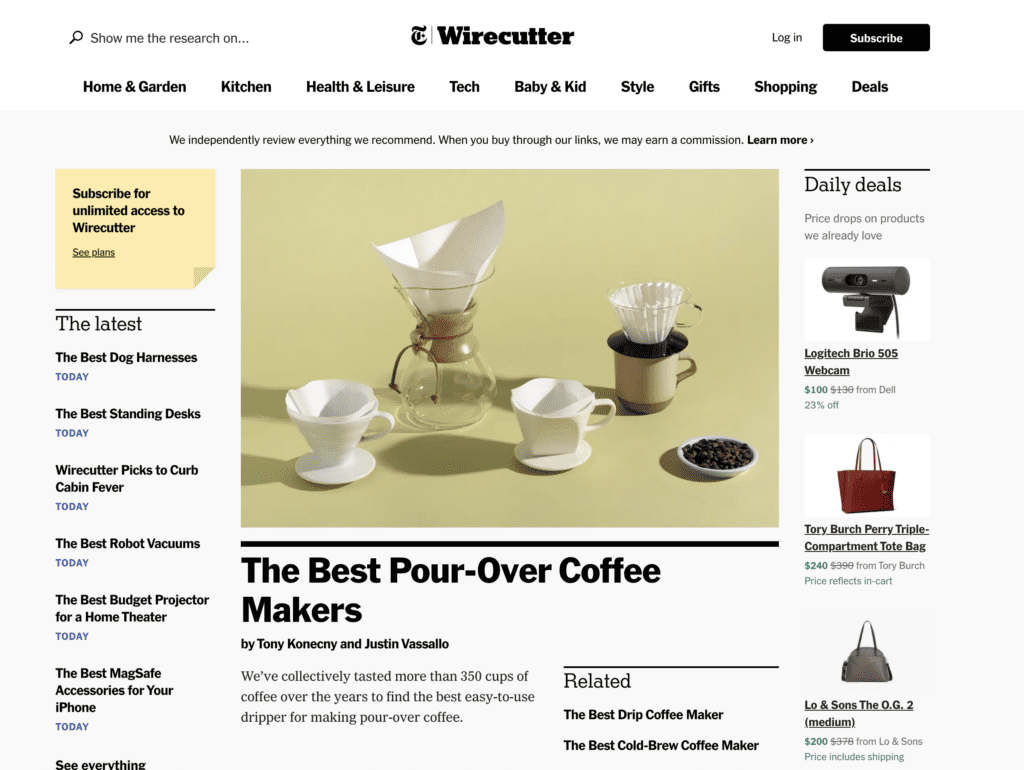
Probably the most prominent is Wirecutter, which bills itself as a “product recommendation service” from The New York Times. Through product reviews and informative articles, sites like Wirecutter can recommend products to readers and earn a cut of each sale they generate.
It adds up fast when you’re getting millions of visitors per month like Wirecutter – but even a site with thousands of monthly visitors can result in a substantial income!
The cool thing is, you can follow this same approach with your own affiliate blog! You just need to decide which niche you want to focus on and find a few affiliate products you can recommend to readers of your content.
NOTE: If you don’t have a ClickBank account yet, be sure to sign up for a free ClickBank account so you can find high-converting products to monetize your new blog!
Why Build a Blog with ClickBank Accelerator?
Before we dive into how to build your blog with ClickBank Accelerator, let’s talk about why you’d want to go with ClickBank Accelerator over other popular tools!
There are obviously a ton of different content management systems (CMSs) and site builders out there these days, including the ever-popular WordPress – as well as similar options like Webflow, Joomla, or Drupal.
So, why Accelerator?
Well, the honest answer is that Accelerator is an affordable all-in-one tool specifically designed for affiliate marketers! What that means is that if you build your blog with Accelerator, you’ll not only be able to build a full website with blog posts that rank in Google search, but you’ll also get access to email marketing, contact management, landing page building, and funnel building!
Even better, all of these separate functions play nicely with each other in one single tool, so you don’t have to work so hard trying to get all of that different technology up and running in your business. Instead, you can focus on the important work of creating content, growing your blog, and getting paid!
Overall, ClickBank Accelerator is an easy and affordable way to get started with free traffic as an affiliate. If you want more details about it, you can read my full ClickBank Accelerator review to get the scoop on this all-in-one affiliate marketing tool from ClickBank!
Or if you’re ready to get access to Accelerator for yourself, get started here!
NOTE: I wrote another article a while back on how to build an affiliate website that focuses on WordPress as the content management system to build your site on. Feel free to check that post out for another take on how to build your blog!
How to Create Your Blog in Accelerator
Okay, assuming you have an Accelerator account and you’re signing in for the first time, I’ll walk you through every single step to get your own affiliate blog up and running!
Remember, once your site is built, you’ll be able to start publishing content that earns you affiliate commissions!
NOTE: Before you start any site, it’s important to think about which niche you want to be in, and which affiliate products you want to promote. It’s beyond the scope of this article to talk about all of those steps, but I cover them in detail in my Profitable Affiliate Blogging System course. Check it out here!
Step 1: Create the Blog
The first thing you’ll want to do if you’re onboarding with Accelerator is select the blog funnel. If you’ve never signed into Accelerator before, this onboarding wizard will come up automatically.
Or you can find it by visiting this link: https://www.cbaccelerator.com/onboard
During this process, you’ll be asked a few questions as follows:
- How do you plan to use Accelerator? Choose “as an affiliate to promote products.”
- What niche will you be promoting products in? Choose the category you’re planning to build your affiliate blog around. If none of them seem like an exact fit, just choose “Other.”
- What type of traffic will you be generating? Choose “organic search.”
- Name your workspace. Call it something related to your name, brand, domain, or niche.
- Choose your theme. Pick one of the three themes that the onboarding wizard is recommending for your combination of niche and traffic source.
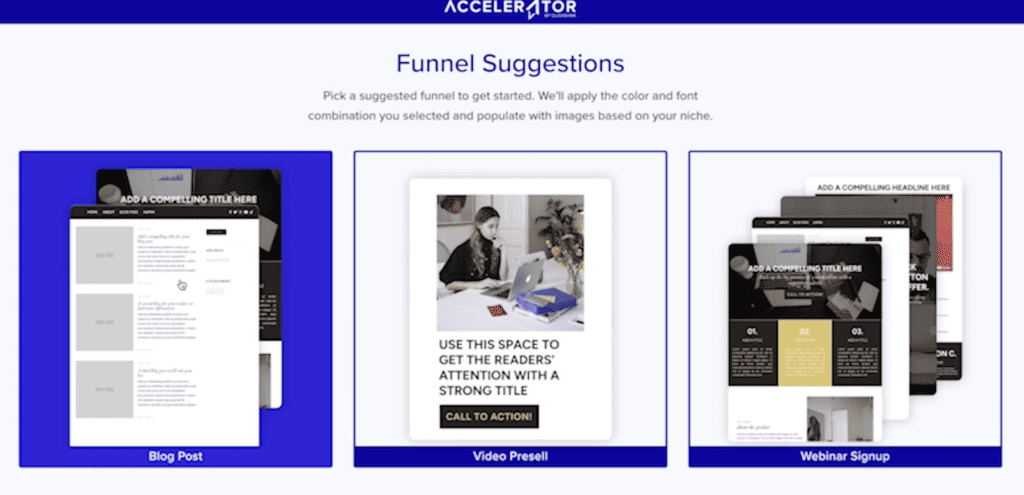
- Pick a suggested funnel to get started. You’ll want to choose “Blog post” as your funnel (as shown below).
And that’s it!
After you make that selection, you’ll see a screen that says “Your first funnel is almost ready!” It’ll take no more than 15-30 seconds for it to finish building your affiliate blog funnel, and then you’ll see a button that says “Launch Funnel Editor.”
Click this to go to the backend of your new affiliate blog inside of Accelerator’s Funnel Manager. From here, you’ll be able to customize the blog design, add pages, and connect a domain. Congratulations – you’ve started a blog!
Step 2: Set Up Your Domain
So, there’s a lot you can do to customize your blog, but I feel like it’s important to get a handle on your domain first.
To find the domain you’re starting with, go to “My Funnels” > “My Domains.” Here’s what you see:

So, where did this domain come from?
Well, remember when you chose a name for your workspace in Step 1? The name you went with – paired with cbaccelerator.com – represents what’s called a “System Domain,” which is created for you when you onboard on Accelerator for the first time.
The System Domain is where Accelerator hosts your site, allowing you to build it without anyone seeing it until you’re ready. Note that the System Domain doesn’t change and will always be there in your Accelerator account – it can’t be deleted or edited.
The other domain type you’ll see when you first go to “My Domains” is the “Primary Domain.” This is the domain that you’ll eventually want to change to something public-facing. For example, I made a website called putterscorner.com in Accelerator – putterscorner.com is my Primary Domain.
Connect a Domain to Accelerator
Ultimately, you’re not building a blog just for you. At some point, you’ll want your website to be visible for potential visitors and for Google!
So, let’s talk about how to connect a new domain to Accelerator.
Add a Domain
First of all, if you’ve already bought a domain from another registrar or domain provider, such as GoDaddy or Namecheap – or you prefer to buy it elsewhere – then you’ll need to choose the “Add a New Domain” button on the My Domains page.
When that dialogue box pops up, you’ll need to add the new domain twice to cover the following two formats:
- mydomain.com
- www.mydomain.com
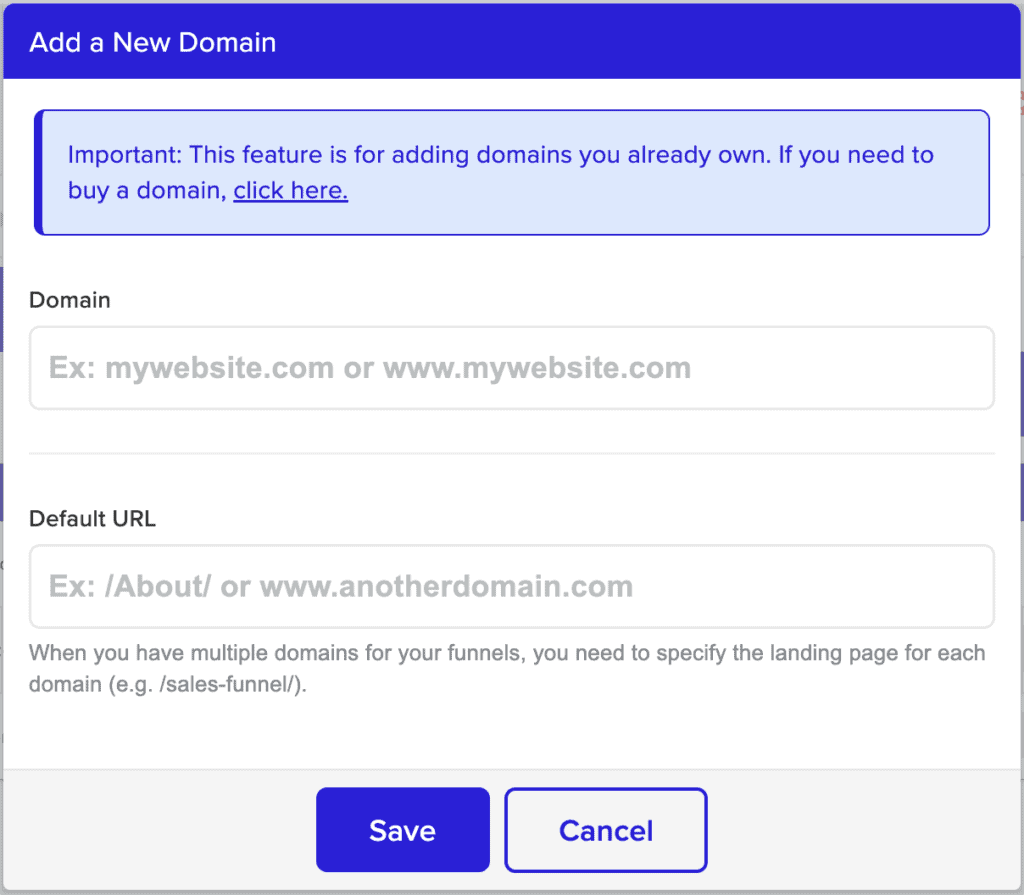
Note that there’s a spot for a Default URL, which is really only necessary if you plan to have a lot of individual landing pages with separate domain names. If you’re only going to be building a blog website based on one domain name, you can ignore that field.
Next, simply hit “Save” and the domain you’ve chosen will be added to the list of Domains associated with your Accelerator account. Again, you’ll want both domain formats added (just the domain itself and the domain with www. before it).
Once the new domains are added to your account, you’ll click “request SSL certificate” and designate the “www.” URL as your new Primary Domain.
Once you’ve changed your “Primary domain,” the site is officially live! This is the URL you want to post or share online, NOT your system domain.
Buy a New Domain
The process of buying a new domain is almost identical to the process of adding a domain that you’ve already bought to your account.
First, you’ll click the “Buy a New Domain” button on your “My Domains” page inside of Accelerator. Here’s what will pop up:
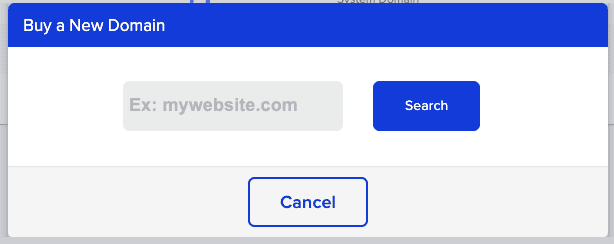
Type in the domain name you want to see if it’s available. If it is, simply go through the steps to make your purchase!
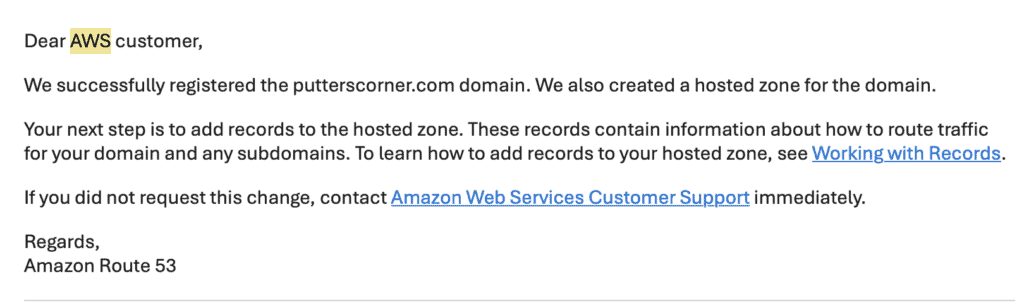
Then, watch for an email from Amazon Web Services (AWS) like so:
Once the domain is purchased, you can do like we talked about in the “Add a New Domain” option and request an SSL certificate where the little lock icon appears under “SSL status” for your new domain.
You’ll also hit the little “star icon” to make your new domain the “Primary Domain.”
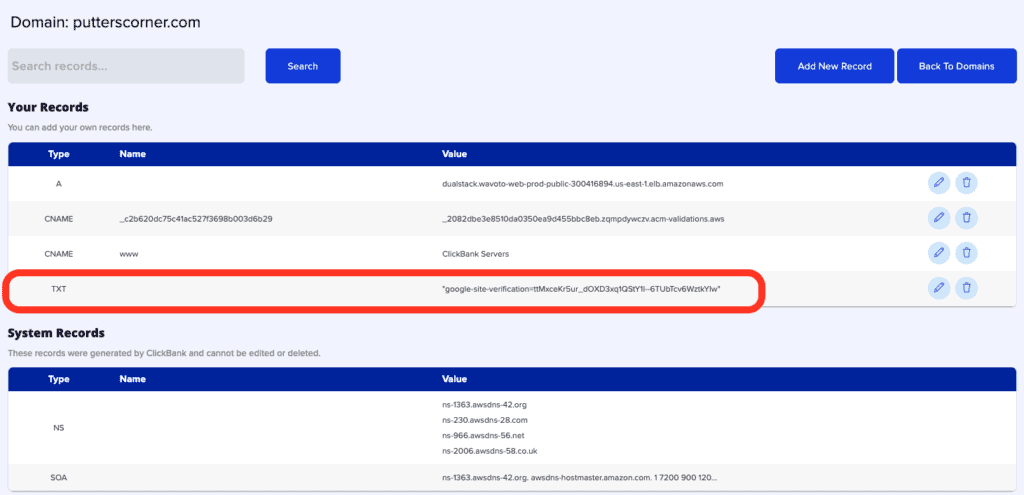
In the screenshot below, you can see that my original System Domain of danielthrasher.cbacclerator.com is still there, but I also successfully added both putterscorner.com and www.putterscorner.com, got my SSL certificate, and designated www.putterscorner.com as my Primary Domain.

Best of all, I can prove that it’s live! Aside from just visiting the URL at putterscorner.com, I captured this screenshot of a Google search I did for “Putters Corner” shortly after I set up my domain in Accelerator:

Pretty exciting, right?
Now, I know this whole domain connection process can seem pretty technical, but by following the on-screen instructions in your account or referring to this step-by-step tutorial, you should be able to get through it just fine!
And if, for whatever reason, you find yourself stuck, you can always contact Accelerator customer support and they’ll make sure you get your new blog live!
Step 3: Set Up Google Search Console
Another technical hurdle you’ll have to get through at some point is setting up Google Search Console. Fortunately, Accelerator makes that pretty easy too!
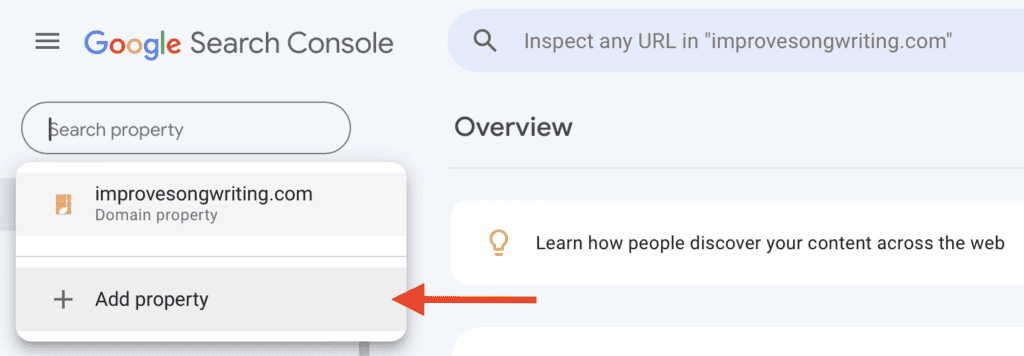
First of all, you’ll start by signing into your Google Search Console account at search.google.com/search-console. If you already have a Gmail address, you’ll cruise right in – otherwise, you’ll need to create one.
Once inside Google Search Console, you’re going to hit the “+ Add property” button, as shown below.
From there, setting up Google Search Console in Accelerator is pretty quick. If you connected your domain to Accelerator already, then you can navigate to My Funnels > My Domains and click the little “Manage” button under “DNS Records.”
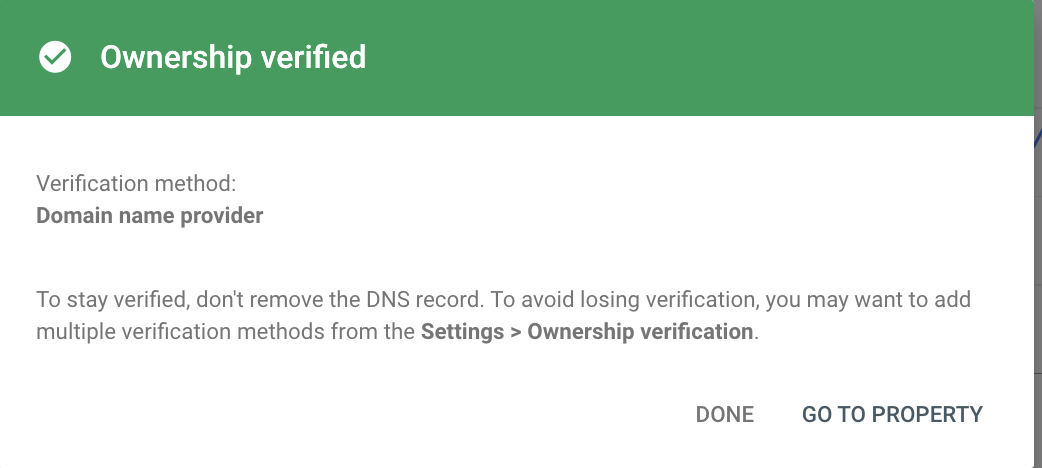
Then, you can hit “Add New Record” and create a TXT type, copy the TXT verification from Google Search Console, and hit save. Done!
It can take a little bit of time for ownership to be verified on Google’s end, but usually no ore than a few hours. Once you see the following in Google Search Console, you’ll know that everything is connected!
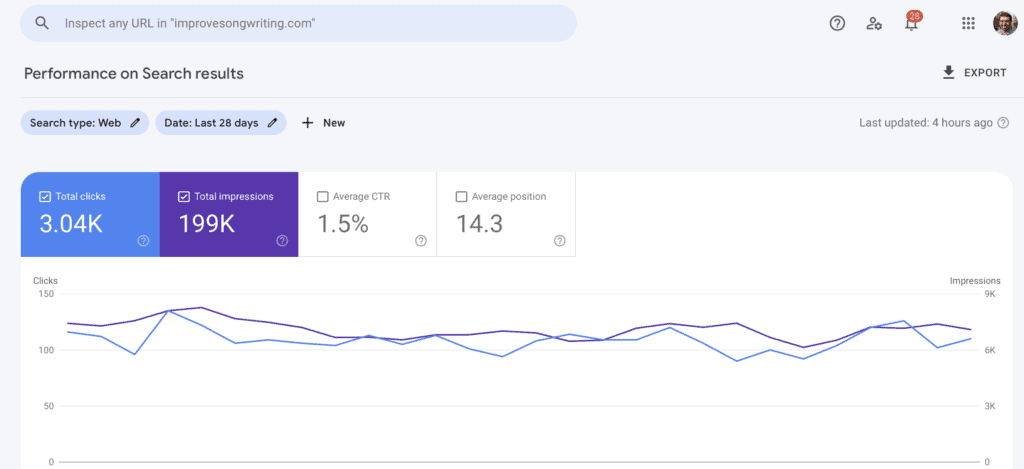
Once this is done, you’ll be able to track keywords, identify technical issues, and all kinds of other useful things directly inside of Google Search Console to help make your content easier to rank in Google!
As an example, here’s what Google Search Console looks like for my own affiliate blog over the last 28 days:
Step 4: Set Up Google Analytics
First, you’ll need to create a Google Analytics account.
If you’ve never signed up for Google Analytics before with your Gmail address, then you may need to go through the steps to create an account for the first time. This can be found under Admin by clicking the little gear icon in the bottom left corner of the screen.
Now, go to My Business > Settings > General in Accelerator to add the tag to the sitewide <head> text.
Then, navigate down to Google in the settings and log in with the Gmail address you created the Google Analytics account with.
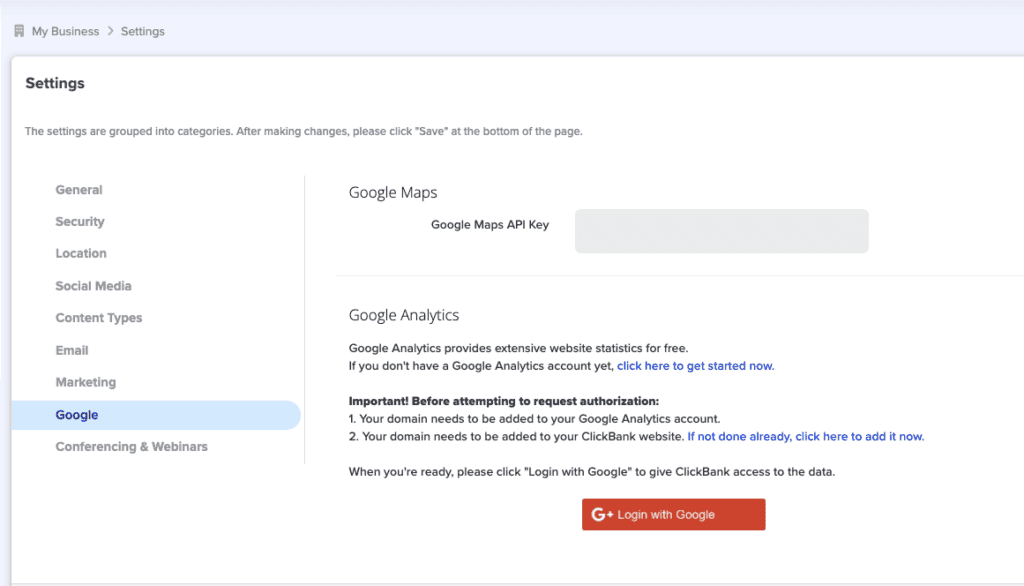
Once prompted, you’ll want to allow access to Wavoto Analytics – this connects ClickBank Accelerator to your Google Analytics. Once that’s verified, you’re all set!
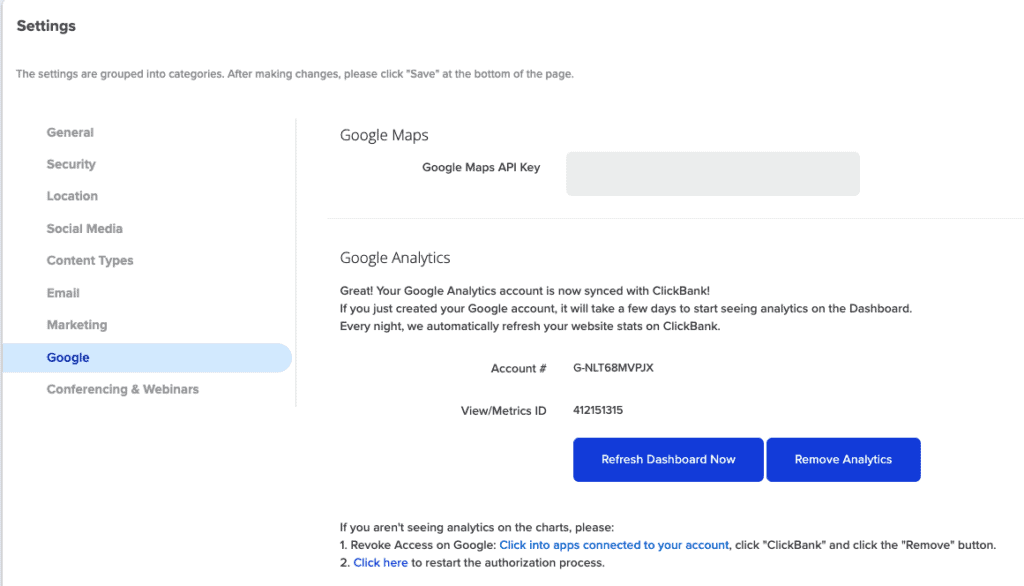
Below, you’ll see what it’ll look like inside Accelerator.
And inside Google Analytics, it’ll probably look something like this immediately after you set it up:
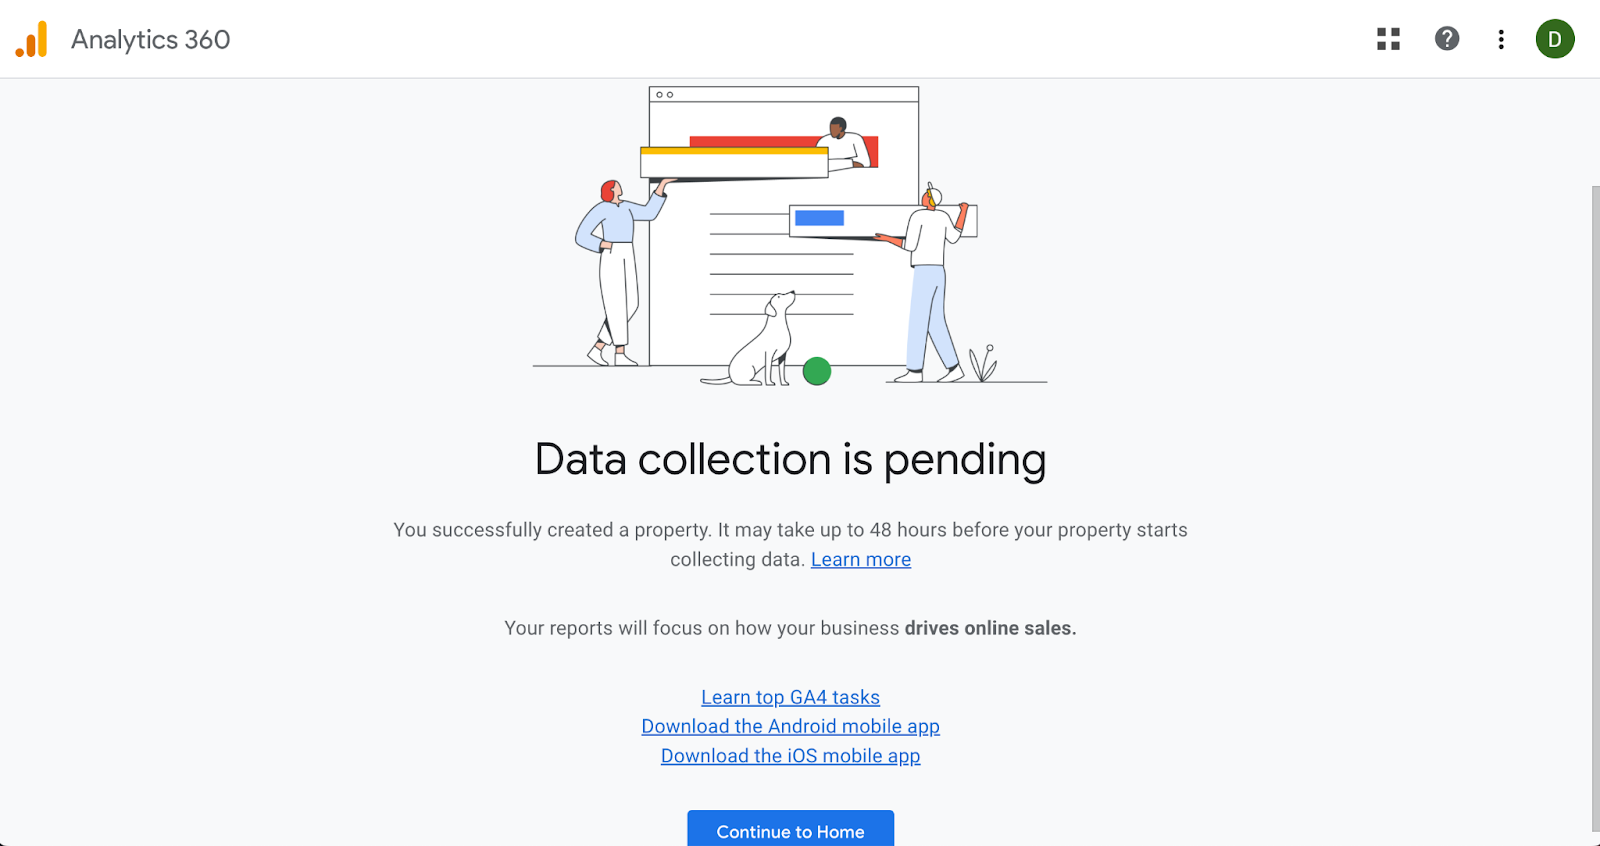
NOTE: It may take a few days to go from pending to having the data flowing, but with these technical steps out of the way, you can focus on more important things, like keyword research and creating content!
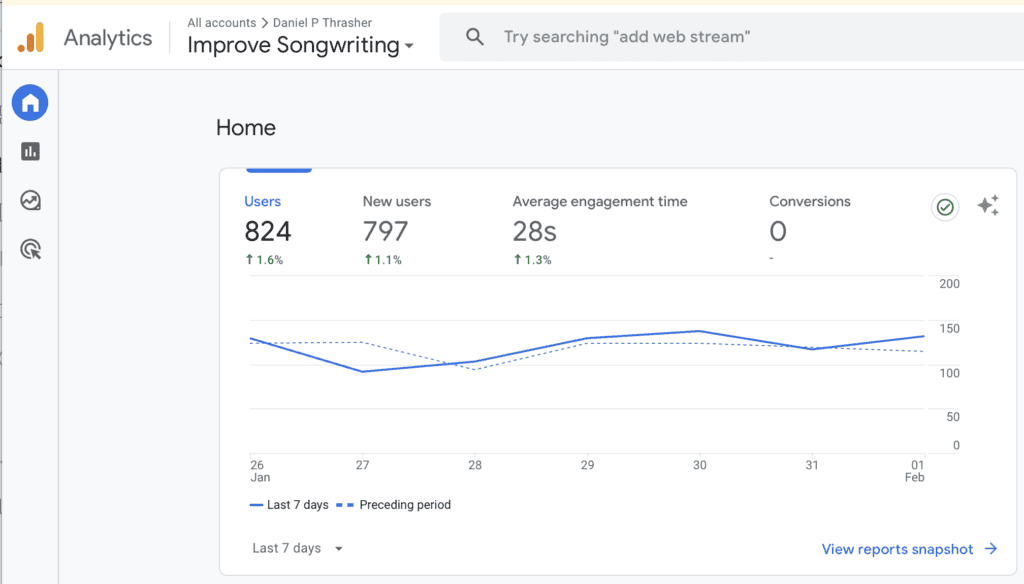
As a reminder, once Google Analytics is set up, you’ll be able to see data about the number of visitors, time on page, traffic sources, and a whole host of other key metrics to tell you how your affiliate blog is performing.
Here’s an example from the Google Analytics setup for my own affiliate blog (from the last 7 days):
How to Customize Your Accelerator Site
In this section, I want to walk you through some key steps to customize your site inside of ClickBank Accelerator.
Step 1: Design Your Home Page
When you first create a site using ClickBank Accelerator, you’re going to land on the Home Page funnel, which will look something like this:

You can easily find your home page under My Funnels > Funnel Manager and go to the Home page funnel. To edit the home page, simply click the “Edit Page” button on the Home page element.
On your home page, there are lots of things you can edit or adjust within the Accelerator interface. When you first get there, you’ll see a blank home page template.
I recommend adding the name of your site, a little tagline, and a new background image. Fortunately, there’s a built-in stock photo library from Pexels that makes it easy to find an image that fits your niche.

Beyond the header, there are a few other sections included in the home page template for your Accelerator blog. You can customize them to your heart’s content, filling in content, adding images, and adding links as needed.
Just keep in mind that if you don’t like any aspect of the universal design of your site, such as brand colors or font choices, you can adjust those in Step 2. Let’s go ahead and look at that now!
Step 2: Adjust Your Theme
ClickBank Accelerator lets you manually adjust the styling of any individual elements on your webpage, including header fonts, button colors, and so on. This is fine on a case-by-case basis, but if you wish that all of your buttons were blue by default instead of red, you’re going to want to make some changes using the Theme Editor.
You can access the Theme Editor by navigating to My Business > Theme Editor. In here, you have a few options:
- My Logos. This is where you can upload a PNG of your website logo and a ZIP file of your favicon.
- My Buttons. This is where you can adjust the styling of the buttons across your entire site, including primary and secondary colors, default colors, and hover colors, as well as a few other style options.
- My Fonts & Colors. This is where you can set the color palette for your site and change the typeface for your titles (H1s), subtitles (H2s), and body text (paragraph).
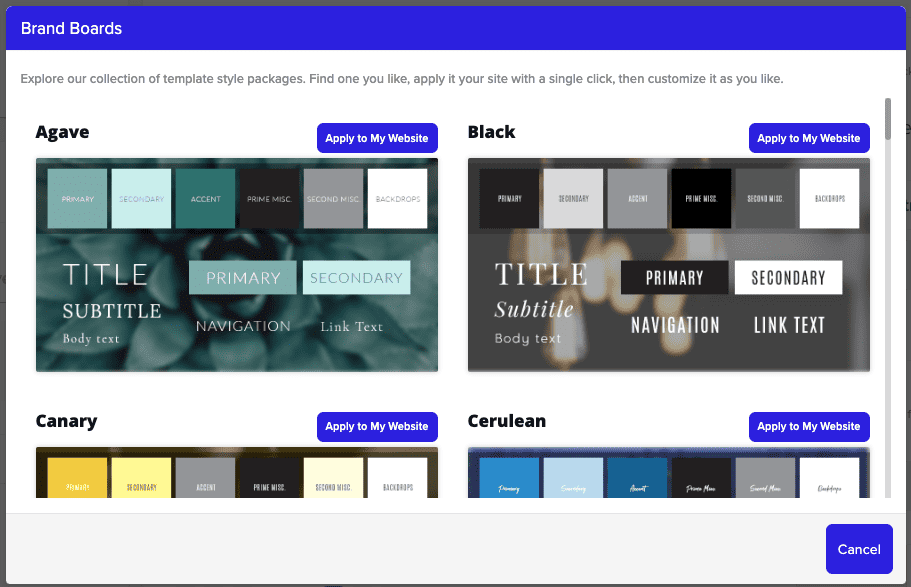
It’s also worth noting that there are Brand Boards included in Accelerator that provide a pre-built set of colors and typefaces that work well together.
You can get there by clicking the “Brand Boards” button to scroll through a collection of templates. When you find one that you like, just hit “Apply to My Website” and it’ll adopt all of those changes in a single click!
Again, this is the way to make a universal change to your site theme, but you can also further customize any of those options right in the Theme Editor.
For example, if I like the Agave theme overall, but I’d like to see a slightly different font for the Title element, I can apply the Agave theme and change just the Title font, which will apply across the whole site.
The only exception is if I’ve overriden the Theme setting for Titles for one specific title. If I adjust it right on the element, then it’ll ignore the Theme. Between global and specific style settings, you have the maximum flexibility in making your site look like you want it to!
Step 3: Create New Pages
Right out of the box, your new ClickBank Accelerator site will include a home page, a blog page, and an about page. For a full affiliate blog website, you should add a few other pages and build them out. Here are my suggestions:
- About page. The about page should include information about your blog and the organization behind it, as well as information about you as an individual founder or author. This page is important for establishing expertise and authority, so be sure to put your best foot forward here.
- Contact page. Both users and Google will trust you and your business more if you have a physical address, email address or contact form, and phone number on your contact page.
- Recommended resources page. This optional page is a single page where you can add all of the recommended resources or solutions related to your niche. Ideally, this includes a list of affiliate products you want to promote, but can also include books, blogs, experts, and other products that would provide value to your audience.
Beyond these pages, I would recommend building a Privacy Policy page and a Terms and Conditions page to cover yourself legally.
Now, where do you create pages in Accelerator?
You need to go to the Editor for your site, which you can access by hitting the Edit page button on your Home page funnel. From here, you’ll see a “Pages” item in the sidebar.
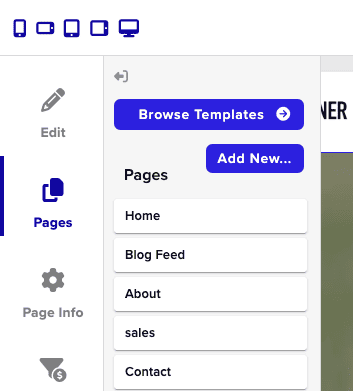
You can see all the current pages that you’ve created for your site in this area. If you want to create a new page, you can do it by hitting the “Add New” button. Each time you create a new page, it’ll automatically be added to your main navigation menu, as shown below.

To see more options for each page, you can go to Page Info. Here, you can decide whether a page is “Live” on the site, whether it’s included in the nav menu, and whether it can be indexed by Google. For most pages, we want all three of these options checked, but it’s good to know how to adjust these settings if you need to!
Step 4: Customize Blog Feed Page
One of the most important pages on your blog site is the blog feed page, because this is where all of your blog posts will live. By default, it doesn’t have a lot on it, so I would start by adding a nice header image at the top. Take a little time to customize the appearance of your blog feed page.
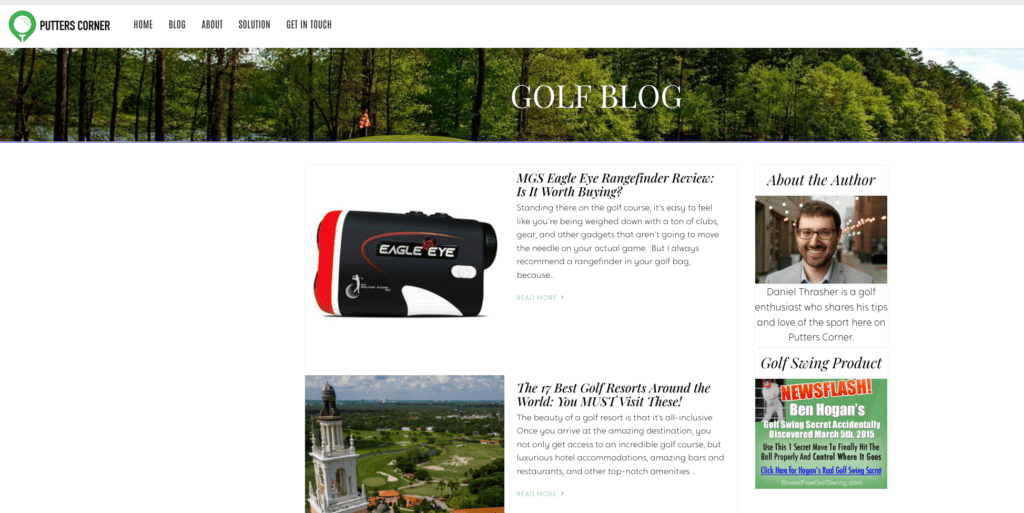
This is also a good time to adjust elements in your sidebar. I always recommend a module talking about yourself or your brand, and another that advertises your top choice of affiliate product. Beyond that, if you’re trying to build an email list, adding an opt-in form in the sidebar may be helpful.
Lastly, you’ll want to start creating actual blog posts with featured images to populate the blog feed itself with real content. I’ll show you how to do that now!
Step 5: Create a Blog Post
Once you’ve learned how to create one blog post inside Accelerator, you can do it again and again. I’ll quickly show you a few things to point you in the right direction.
First of all, if you’re still on the blog feed page after Step 4, you can click the little gear icon in the upper right corner of your blog feed and hit the “Add New Post” option to create a new blog post.
Another option is to go to My Content > My Posts and hit the “New Post” button there.
But whichever method you use to create a new blog post, the next thing you’ll need to do is edit it.
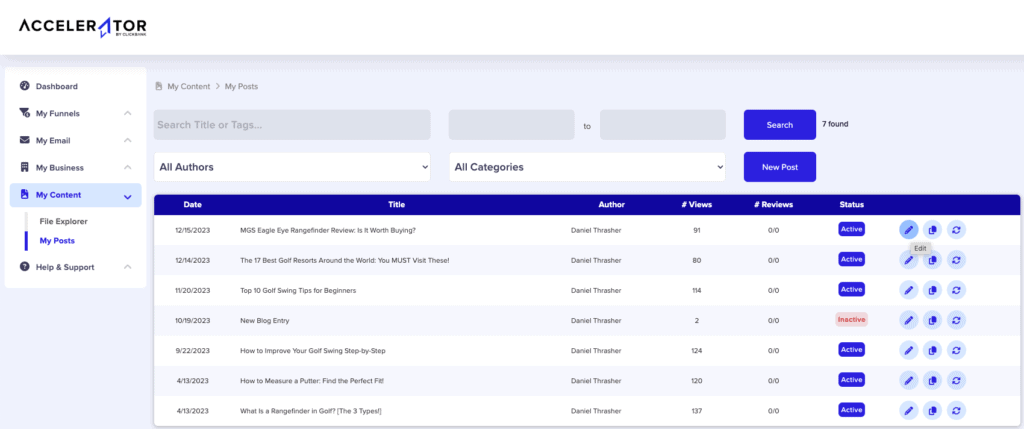
Hit the pencil icon and you’ll see a screen like the following:
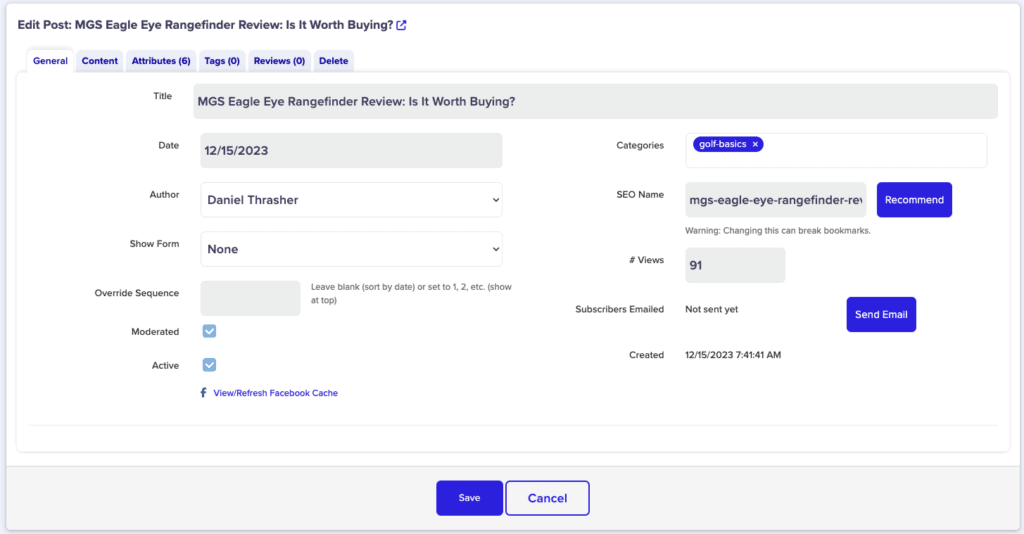
This General tab includes the title of the post, the author, the blog post category, and the SEO name (aka the slug or URL). This is all important for SEO.
Next, you have the Content tab, which includes the meat of the post. Generally, I find it easier to edit the post directly on the post page, which you can access through the blog feed page inside your Blog Funnel. Just click the post you want to edit and you’ll see something like this:
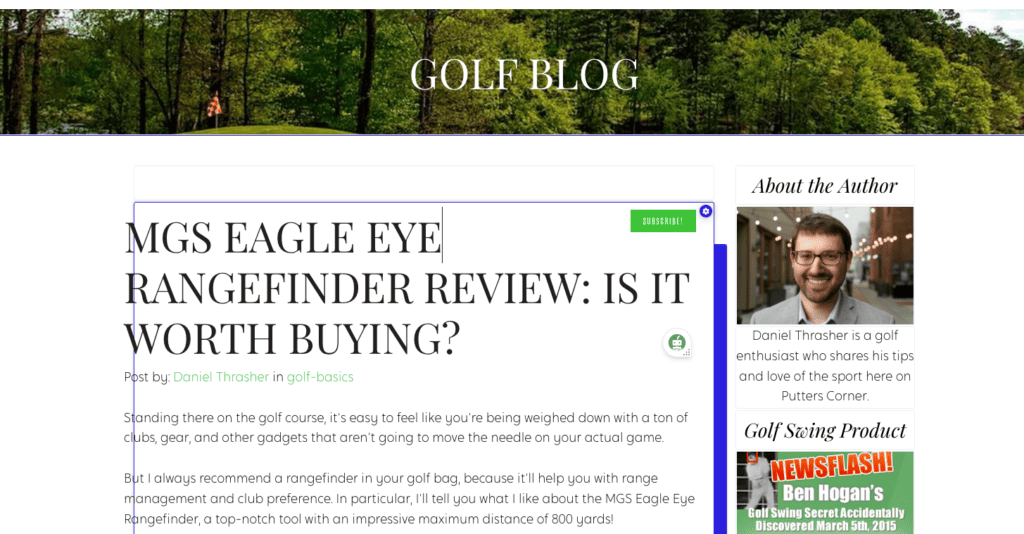
It’s easy to include all of the copy, images, links, buttons, and other important elements in your post right here. To go back and edit the SEO details of the post, there’s a handy “Edit Details” link at the bottom of the post for you.
Lastly, there’s an Attributes tab to edit, which includes the SEO image (which is what will show up in a link preview) and the SEO description (sometimes called a meta description, this is what may appear in Google next to the blog post).
All of these are important to maximize the SEO potential of your articles. As you publish new blog posts on your site, you’ll increase the likelihood of your content pages ranking in Google and bringing in organic traffic each month.
With a big enough site, you’ll start to see consistent and meaningful income from conversions on affiliate links, which can appear as in-text links, banner images, buttons, and other elements right in your articles!
What’s Next?
In this guide, I walked you through how to create a blog inside of ClickBank Accelerator, set it up to work with Google Analytics and Google Search Console, and start customizing your blog so that it’s ready for you to publish content, rank in search, and start generating affiliate commissions.
If that’s where you’re at, then your journey is still just beginning! There’s so much more to learn about how to do search analysis, how to optimize your content for SEO, and how to monetize your affiliate site.
As I mentioned before, I show you how to do all of this step-by-step inside of the Profitable Affiliate Blogging System. With the advent of AI tools, it’s never been easier to start finding success with your own affiliate blog, so if you’re interested in growing an income through your ClickBank Accelerator blog, be sure to check it out!
I love blogging and SEO, because it’s a fun (and challenging) combination of creative and technical skills that’s constantly keeping me on my toes. Hopefully, this article has given you a good foundation to build on for your own SEO and affiliate blogging journey.
I regularly answer student questions inside our Spark student community, so if this is the path you want to pursue to grow your online income, I’ll see you inside!